Lesson 1- What is the Earth?
Grade Level: 2nd Grade
Objectives:
-Students will recognize that the Earth is divided into 7 continents and 5 oceans, containing numerous living and non-living things
Essential Questions:
-What is on our Earth?
-How are the things on our Earth organized?
I) Standards Addressed:
Virginia SOLs:
Geography 2.5- The student will develop map skills by
a) locating the equator, the seven continents, and the five oceans on maps and globes
Living Systems 2.5- The student will investigate and understand that living things are part of a system. Key concepts include
a) living organisms are interdependent with their living and nonliving surroundingsWriting 2.11- The student will write stories, letters, and simple explanations.
a) Generate ideas before writing.b) Organize writing to include a beginning, middle, and end
National Curiculum Standards for Social Studies:
- People, Places, and Environments
- Global Connections
II) Materials for Learning Activities
A) Student Materials (per student):
1. Interactive social studies notebooks
2. 1 or 2 “Earth word” cards
3. Crayons or colored pencils
B) Teacher Materials:
1. Notepad
2. 1 pen
3. Interactive social studies notebooks
4. “Earth word” cards
5. Marker
6. Tape
7. Whiteboard
8. Pre-prepared Earth mind-map poster on sheet paper
III) Procedures for Learning Activities (45 minutes)
A) Introduction (15 minutes)
1. While students sit at their desks, let them know that they will be beginning a new and exciting unit all about geography.
2. Ask them if they know what the word geography means. Call on a few students to share their thoughts. Confirm that geography is the study of the places and things on our planet Earth.
3. Ask students, what is on our Earth? Tell them to take a few minutes to think about that question silently, to themselves.
4. Tell students to take out their interactive social studies notebooks and to turn to a new blank page, so they may begin their new unit of study. Tell them to save this blank page, so they may later create their unit title page, which will have the title “Geography and Us!” Write this title on the whiteboard.
5. Tell students to turn to the next blank page. On that blank page, they will need to use the webbing strategies, which they plan their writing with, in order to create a “mind map” of ideas.
6. Hold up your interactive social studies notebook page and on the top demonstrate how you write the title “The Earth.” Underneath it, draw a quick sketch of the Earth in the middle of the page. From your central picture extend lines to begin recording some of your ideas about the Earth. Your page should begin to look like the following sketch:
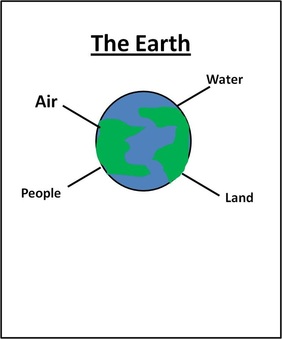
Figure 1. "The Earth" Mind Map
7. Remind students that a mind map is just a way to organize their ideas to see what they already know. Encourage them to include as many ideas as possible by extending lines from their sketch of the Earth and writing one idea next to each line.
8. Tell students they will have 5 minutes to create the best mind maps they can. Remind them to answer the question, what is on our Earth? Where do we find the things on Earth? What do they see at school, home, and around other places that are all on our Earth?
9. Tell them to begin creating their mind maps. As they do so, walk around to assist any students as necessary and take anecdotal notes.
10. After enough time has passed, ask students to stop working on their mind maps. Tell them to turn to their shoulder partners to share their mind maps. Give them about 2 minutes to do so and then ask them to stop.
B) Instructional Strategies (20 minutes)
1. Tell students that you saw great mind maps and heard them share plenty of wonderful ideas that did answer the question, what is on our Earth?
2. Let the students know that their next activity will help them find out what is on our Earth.
3. Take out the pre-prepared index cards with “Earth words” and pass them out so that each student receives one or two. Tell the students to illustrate their word once they get their card. For example, if their card says water, then they can illustrate it by drawing a drop of water, a pond of water, some rain, etc.
4. Once students have illustrated their “Earth word” cards, tell them to bring their cards to have a seat on the carpet in a U-formation.
5. Once students are seated and ready, explain that every person has a card that represents something on our Earth, but we can’t just throw all the cards in a pile, because things on Earth are not just thrown around in a big pile.
6. Explain that our Earth is a highly organized place, in general, even though there are things on Earth that are not so organized.
7. To learn about how our Earth is organized, tell the students that they will have to organize their cards onto a giant Earth min map poster that they will create as a class.
8. Take out the pre-prepared poster of sheet paper and show students how you have set up two main categories to begin organizing the Earth: living and non-living things. Continue sitting in a U-formation so everyone can see the poster clearly, right-side up.
9. Review the definitions of both categories and then ask students to look at their “Earth word” cards and to raise their hands if they think they have a card with a living thing. Next, ask students to raise their hands if they think they have a card with a non-living thing.
10. Working collaboratively with the students, sort the Earth cards and tape them onto the pre-prepared Earth poster on sheet paper. The final poster should have categories that look similar to the image below
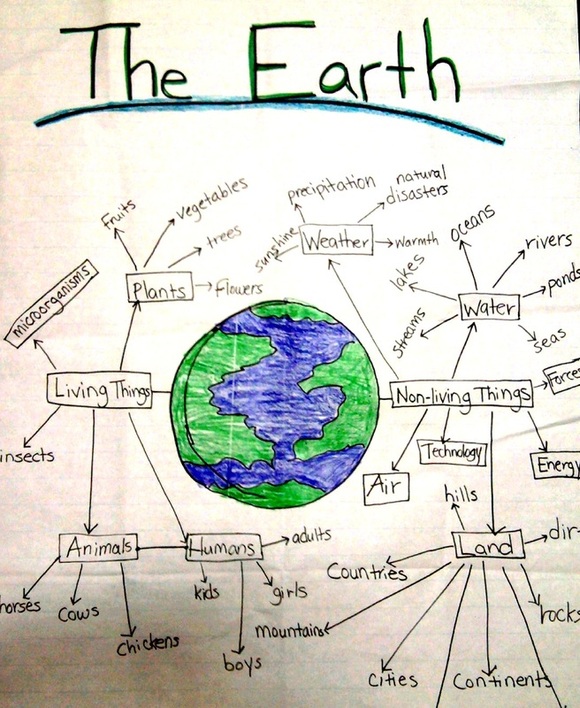
Figure 2. Class Earth Mind Map Poster
11. Tell the students that you will hang up the poster in the classroom so that it is up by their next social studies lesson.
C) Summary (10 minutes)
1. After working on the Earth poster mind map, ask students to go back to their seats and tell them to turn to a new page in their interactive social studies notebook.
2. Remind the students that it is important to reflect or think about anything they learn so that they can check their understanding and ask important questions about anything they do not fully understand.
3. In the new blank page in their interactive social studies notebooks, tell the students to write today’s date and then the title “Reflection.”
4. For their reflection entry, ask the students to answer the following questions:
1. How is your Earth mind map the same or different from the one we created as a class? Would you change anything?
2. How is our Earth organized?
5. Tell students that it is okay to include illustrations with their reflection writing and tell them that they may decorate their “Geography and Us!” unit title page once they have completed their reflections. Remind them to focus on their reflections, because they will have plenty of time to decorate their title page throughout their new unit.
6. For homework, encourage students to keep asking questions and making observations to learn what else is on our Earth!
7. When enough time has passed, ask students to turn in their interactive social studies notebooks by stacking them on your desk with their mind map and reflection pages open.
8. Clean-up.
IV) Assessment
A) Teacher will pre-assess students’ knowledge by observing how they create their individual mind maps and by listening to their discussion responses with their partners
B) Teacher will take anecdotal notes throughout the lesson
C) Teacher will collect students’ interactive social studies notebooks to check their reflections
V) Differentiation
A) Lesson includes opportunities for scaffolded expression through oral discussions, hands-on experiences, writing, and illustrating
B) Teacher may distribute “Earth cards” for the collaborative mind map poster based on students’ abilities
C) Teacher may extend the lesson by having students compare their original mind maps and the class’ mind map using a Venn diagram
VI) Technology Integration
No technology is necessary for this lesson.
